개인 프로젝트를 진행하면서, 지금까지 잘 사용하지 않았던 EnabledEdgeToEdge 를 사용해보기로 하였다.
이를 사용하면 기존에 사용했던 accompanist-systemUiController 를 사용하지 않고, 그저 enabledEdgeToEdge 의 파라미터로 색상을 넘겨주면 된다고 하여 진행하였지만, enabledEdgeToEdge 를 사용하면서 한 가지 문제가 생겼다.
바로 ImePadding 을 사용 시 SystemBar 만큼의 Padding 이 추가되는 문제가 생겼다는 것이다.
이것을 해결하기 전, 예시를 보여주기 위한 코드를 설명할 것인데 해결 방법만 필요하다면 스크롤을 내려 해결 방법만 봐주면 된다.
# 해결 방법을 알아보기 전, 해결법 적용 전 후 차이를 알아보기 위해 테스트용 코드를 생성해보자
@AndroidEntryPoint
class MainActivity() : ComponentActivity() {
    override fun onCreate(savedInstanceState: Bundle?) {
        super.onCreate(savedInstanceState)

        setContent {
            enableEdgeToEdge()
            val snackbarHostState = remember { SnackbarHostState() }

            GyuDefaultTheme {
                CompositionLocalProvider(LocalSnackbarHostState provides snackbarHostState) {
                    DevGyuNavigator()
                }
            }
        }
    }
}

val LocalSnackbarHostState = compositionLocalOf<SnackbarHostState> {
    error("No SnackbarHostState provided")
}

@OptIn(ExperimentalComposeUiApi::class, ExperimentalAnimationApi::class)
@Composable
fun DevGyuNavigator(){
    val navController = rememberNavController()

    NavHost(
        navController = navController,
        startDestination = MainNavGraph.MainTest.route,
    ){
        composable(
            route = MainNavGraph.MainTest.route,
            arguments = MainNavGraph.MainTest.arguments.map { it.namedNavArgument }
        ){ entry ->
            val transitionIsRunning by remember(this.transition.isRunning) {
                mutableStateOf(this.transition.isRunning)
            }

            Scaffold(
                modifier = Modifier
                    .fillMaxSize()
                    .pointerInteropFilter {
                        return@pointerInteropFilter transitionIsRunning
                    },
                snackbarHost = {
                    SnackbarHost(
                        hostState = LocalSnackbarHostState.current
                    )
                },
                content = {
                    Box(
                        Modifier
                            .animateContentSize()
                            .padding(it)
                    ) {
                        MainTestScreen()
                    }
                }
            )
        }
    }
}
위는 MainActivity 및 NavHost 구현 부인데, NavHost 를 구현하고 그 안에 Scaffold 를 통해 Screen 을 보여지도록 설정하였다.
다음으로는 MainTestScreen 를 구현해보자
@Composable
fun MainTestScreen(){
    MainTestContent()
}

@Composable
private fun MainTestContent(){
    Box(
        modifier = Modifier
            .fillMaxSize()
            .background(Color.White)
    ) {
        LazyColumn(modifier = Modifier.fillMaxSize()) {
            items(50) {
                Text(text = "1414", color = Color.Black)
            }
        }

        TextField(
            modifier = Modifier
                .imePadding()
                .align(Alignment.BottomCenter),
            value = "",
            onValueChange = {},
            placeholder = {
                Text(text = "입력이 필요")
            }
        )
    }
}
ImePadding 을 정상적으로 적용하기 위해 Box 를 우선 생성하고, 이 안에 LazyColumn 과 TextField 를 구현한다.
이후 TextField 에 ImePadding 을 적용해보고 이곳에 포커스를 주어 키보드가 올라오게 실행해보자
ImePadding 을 주었으니 키보드만큼의 Padding 이 주어져야한다고 생각하였지만, StatusBar 높이만큼 Padding 이 더 주어지는 것을 확인할 수 있다.
이를 해결하기 위해서는 다음과 같은 방법을 사용하면 된다.
# 해결 방법 1
- Scaffold 를 사용 시 contentWindowInsets 를 사용하기
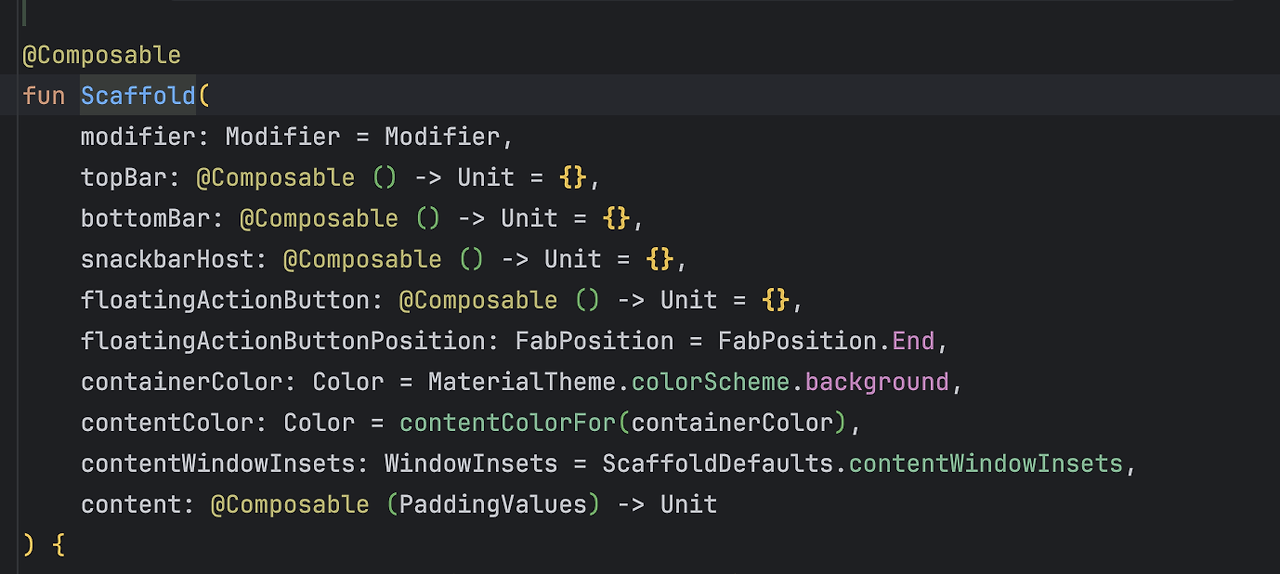
Scaffold 의 내부를 살펴보면 contentWindowInsets 라는게 있는데, 이것은 자식들의 WindowInsets. 즉, 안드로이드 시스템 창과의 경계 관련 정보를 설정하는 객체이다.
기본 설정된 값이 있을텐데, 이곳에 WindowInsets(0.dp) 를 설정해주어 자식들에 여백이 생기지 않게 설정할 수 있다.
# 해결 방법 2
- consumeWindowInsets 를 사용하기
만약 composable 내에서 Scaffold 를 사용하는 것이 아닌, 여러 Layout Composable 들을 사용한다면 설정하고 싶은Layout Composable 의 Modifier 에 다음과 같이 설정해준다.
// padding, consumeWindowInsets 모두 NavHost 가 전달하는 PaddingValues 사용
Box(
    Modifier
        .padding(it)
        .consumeWindowInsets(it)
) {
    MainTestScreen()
}
# 추가로 SnackBar 에도 동일한 현상이 일어나는 경우 다음과 같이 실행하면 된다.
@OptIn(ExperimentalComposeUiApi::class, ExperimentalAnimationApi::class)
@Composable
fun DevGyuNavigator(){
    val navController = rememberNavController()

    NavHost(
        navController = navController,
        startDestination = MainNavGraph.MainTest.route,
    ){
        composable(
            route = MainNavGraph.MainTest.route,
            arguments = MainNavGraph.MainTest.arguments.map { it.namedNavArgument }
        ){ entry ->
            // 추가
            var contentWindowInsets by remember { mutableStateOf(PaddingValues(0.dp)) }
            val transitionIsRunning by remember(this.transition.isRunning) {
                mutableStateOf(this.transition.isRunning)
            }

            Scaffold(
                modifier = Modifier
                    .fillMaxSize()
                    .pointerInteropFilter {
                        return@pointerInteropFilter transitionIsRunning
                    },
                snackbarHost = {
                    SnackbarHost(
                        // Modifier 추가
                        modifier = Modifier
                            .consumeWindowInsets(contentWindowInsets)
                            .imePadding(),
                        hostState = LocalSnackbarHostState.current
                    )
                },
                content = {
                    contentWindowInsets = it
                    Box(
                        Modifier
                            .animateContentSize()
                            .padding(it)
                    ) {
                        MainNavGraph.MainTest.NavigateScreen(navController, entry)
                    }
                }
            )
        }
    }
}
위처럼 SnackBarHost 의 Modifier 에도 NavHost 가 전달해주는 Padding 을 적용할 수 있게끔 상태 객체를 추가하여 전달한다.
이렇게 ImePadding 에서 Padding 이 추가로 적용되는 문제를 해결해보았다.
contentsWindowInsets 및 consumeWindowInsets 시 이것이 해결되는 이유는 WindowInsets 이 상위 레이아웃에서 패딩 정보를 처리한 후 하위 레이아웃으로 전파하는데, 이를 자식에게 전파하지 않게 막아주기 때문이다.
이를 활용하여 앞으로 ImePadding 문제 없이 개발을 잘 해나가보도록 하자.


